Entertainment
A&E Television's Pick for the Most Influential Person of the Millennium: Who Topped the List and Why It Matters
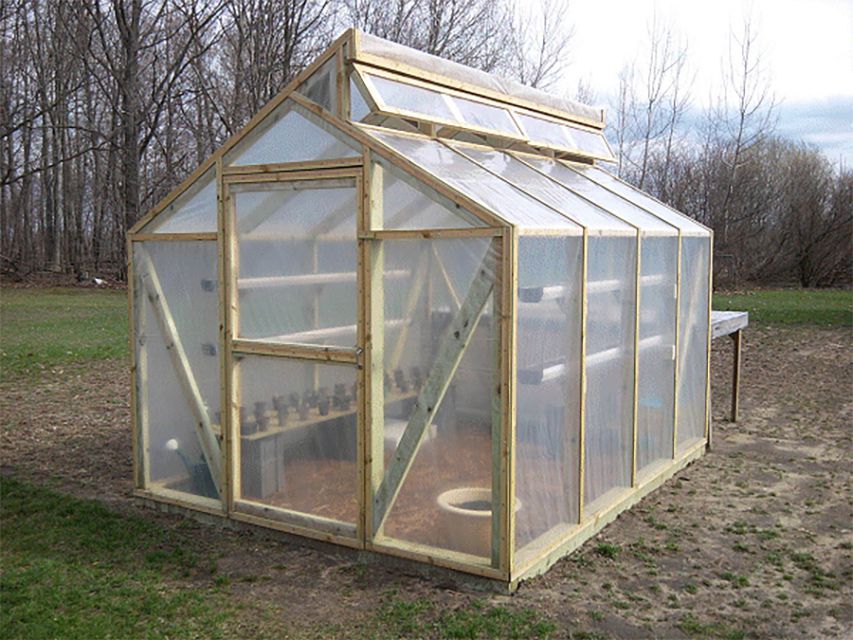
A well-built DIY greenhouse protects plants, extends your growing season, and stabilizes temperature and humidity. You can assemble a kit with pre-cut parts, construct a classic wood-framed house with polycarbonate panels, or bend cattle panels into an arched tunnel for a fast, low-cost build. In this guide, you’ll choose the right design, select materials, plan foundations and ventilation, then follow step-by-step build workflows with tools, tips, and maintenance practices grounded in real examples and pro guidance [1] [2] [3] [4] [5] .
Begin by defining purpose and size. For seed starting and year-round herbs, a compact footprint (for example, 6×8 ft) can work. For food production or overwintering perennials, larger spans (10×12 ft or 8×16 ft) improve capacity and workflow. Place the greenhouse on level ground with maximum sun exposure, typically a south or southeast orientation. Ensure clearance for doors and vents, and consider proximity to water and power for irrigation and heaters. If using a kit, inventory parts, mark panel orientations, and preassemble subcomponents to speed assembly and reduce errors, which major home improvement instructions emphasize for polycarbonate kits [1] . Many DIY plans advise choosing framing and covering materials alongside ventilation and temperature control before you cut wood or pour a base so you don’t lock in a design that’s hard to heat or vent later [2] .
Frames commonly use pressure-treated lumber, galvanized steel, aluminum, or cattle panels. Treated lumber is affordable and easy to customize; spacing studs to match panel widths reduces cutting and waste. One detailed 8×16 example used treated 4×6 for the base, 4×4 corner posts, and 2×4 studs at 24 inches on center to align with 26-inch corrugated plastic sheets for overlap and weatherproofing
(illustrative case)
[3]
. Aluminum kit frames are light and corrosion-resistant; kit makers include bolts, brackets, and labeled panels-following the manufacturer’s order of operations is key
[1]
. For low-cost tunnels, cattle panels (typically 50-in by 16-ft livestock panels) bend into arches over a simple wood base and accept poly film, offering speed and flexibility for width/height
[5]
.
Coverings include twin-wall polycarbonate (durable, insulating), corrugated plastic sheets (rigid, economical), or greenhouse-grade polyethylene film (cheapest, periodic replacement). When using polycarbonate sheets from kits, keep UV-coated faces outward and avoid leaving panels on grass to prevent scorching, both pointed out in kit assembly guidance [1] . For any covering, plan sealed joints but leave designed openings for vents and doors to control humidity and heat [2] .

A level, anchored base protects against racking and wind. Common options include a treated lumber perimeter on compacted gravel, deck blocks with anchored sills, or a slab. One real-world build used a treated 4×6 rectangle set over weed barrier fabric with rebar pins driven through the lumber into the soil to resist uplift and spread loads; walls were framed separately, then secured to the base
(example)
[3]
. Kits often specify an aluminum base anchored to a wood frame; verify levelness before locking the frame to prevent panel misalignment and binding doors
[1]
. For arched cattle-panel builds, many makers use 2×4 baseboards tied to ground anchors for lateral stability before bowing panels into place
[5]
.
Ventilation supports temperature control and air exchange to reduce mold and mildew. Add ridge or roof vents plus intake/exhaust paths; use manual or automatic openers and continuous-duty circulation fans to distribute heat evenly in winter. Articles on greenhouse setup advise integrating adjustable vents and fans during construction, not as an afterthought, and ensuring the door framing leaves space for airflow devices [2] . If heat is needed, electric heaters are clean and convenient where power is available; solid-fuel or oil heaters require safe venting to the outside and fire-safe clearances [2] . In gable designs, dedicated vent framing at the end wall can be built into trusses, as demonstrated in project videos that show collar ties and vent openings integrated into gable assemblies [4] .
Tools: drill/driver on low torque, ratchet/wrench, level, tape, square, rubber mallet, ladder. Steps: (1) Unpack and sort parts; mark panel sides with UV coating. (2) Preassemble small subassemblies and door frames. (3) Build and level the base. (4) Link frame members using T-bolts/brackets per instructions. (5) Assemble ridge and rafters. (6) Install doors and stops. (7) Insert and secure panels, keeping the UV face outward, and don’t store panels on grass during assembly. (8) Add vents/fans and seal joints as specified. This flow aligns with a major retailer’s kit build guide and helps DIYers avoid common mistakes like misoriented panels or out-of-square bases [1] . Practical tip: Have a second person hold panels during installation to prevent flex damage and ensure the fasteners seat squarely.
Tools: circular saw or miter saw, drill/driver, exterior screws, construction adhesive, level, stakes and string, post level, safety gear. Steps: (1) Stake out an 8×16 or similar footprint; level and compact the soil. (2) Build a treated 4×6 base over weed barrier; pin with rebar every few feet for uplift resistance. (3) Pre-frame long walls in a garage or flat area and stand them on the base; tie in end walls with a centered door opening. (4) Use 4×4 corners and 2×4 studs at 24-inch centers if your sheeting is ~26 inches wide to allow overlapping and weather shedding. (5) Install rafters/trusses and collar ties; frame gable vents. (6) Skin the lower half in tongue-and-groove treated boards for durability; sheath the upper half and roof in corrugated plastic or polycarbonate, overlapping and sealing joints. (7) Hang a door (a simple Dutch door is feasible) with robust hinges and latches. (8) Stain or seal the exterior. This sequence reflects a detailed real-world build and demonstrates how stud spacing can match sheet width to reduce trimming and leaks [3] . Consider roof pitch to shed snow and locate automatic vent openers near the ridge for best heat relief [2] .
Tools: bolt cutters (if needed), fencing staples or heavy-duty straps, exterior screws, driver, hand saw. Steps: (1) Build a rectangular 2×4 base and anchor corners to the ground with stakes or dedicated anchors. (2) Bend 16-ft cattle panels into arches and fasten their ends to opposing baseboards to form a tunnel. (3) Frame simple end walls with a door and optional vent window. (4) Drape greenhouse-grade poly film; pull taut and secure with battens, wiggle wire channel, or lath strips. (5) Add rope/webbing over the film in windy areas. (6) Install a fan and/or roof vent if possible. This approach is praised for simplicity and flexibility; builders note you can adapt panel count to your target width and create a 10×16 or similar layout quickly, replacing film as needed over time [5] . Video overviews comparing greenhouse types reinforce its low cost and ease while acknowledging periodic plastic replacement as a tradeoff [5] .
Site Prep: Clear vegetation, level, and compact. Use a gravel layer for drainage. Mark square corners using the 3-4-5 triangle method. Base and Anchoring: Assemble treated lumber or kit base on level ground; verify diagonals are equal. Anchor with rebar or ground anchors to reduce wind lift, as seen in successful DIY case builds [3] . Framing: Preassemble subcomponents-doors, ridge, or truss elements-before raising frames, a practice emphasized in kit guides to speed work and maintain accuracy [1] . Sheathing/Coverings: Install rigid panels with correct orientation and overlap; seal joints and leave planned openings for vents and doors per DIY instructions [2] . In gable designs, you can incorporate vent framing and collar ties in end trusses; video walk-throughs show how gussets and ties add stiffness while leaving vent openings [4] . Finishing: Add fans, thermostats, and automatic vent openers; install benches or raised beds for efficient layout and ergonomic access, which many greenhouse guides highly recommend [2] .
Ventilation: Use adjustable roof or ridge vents plus a circulation fan to prevent heat stratification; many sources advise continuous fan operation in colder months for even heat spread [2] . Heating: Where electricity is available, consider electric heaters for clean operation; otherwise, vented combusting heaters are options with proper safety clearances and exhaust routing [2] . Beds and Layout: Raised beds improve drainage and accessibility and can be integrated into the foundation plan; DIY guides often recommend them for neat layouts and thermal mass opportunities [2] . Doors and Access: A Dutch door is a practical DIY project and allows partial opening for airflow while keeping pets out, as one example build demonstrated [3] .
Keeping It Square and Level: Check square at every step-uneven bases lead to binding doors and misfitting panels. Kit tips stress assembling and aligning bases meticulously before tightening hardware [1] . Wind Uplift and Racking: Anchor bases with rebar or ground screws; add diagonal bracing in wood frames and ensure secure panel fastening on arched builds [3] [5] . Moisture and Mold: Prioritize cross-ventilation and run circulation fans; leave designed vent space and seal only at joints, not at the expense of airflow paths [2] . Cover Longevity: Polycarbonate resists UV and insulates well; poly film is cost-effective but may need replacement after seasons of sun and wind. Comparative DIY reviews highlight film replacement as normal maintenance on tunnel houses [5] . Panel Orientation: Keep UV-coated faces outward and avoid storing panels directly on lawns, which can scorch grass and damage panels, per kit guidance [1] .
• If you want the fastest route with clear instructions: Select a polycarbonate kit sized for your space. Inventory parts, assemble subcomponents, build and level the base, then frame and panel following the manufacturer’s sequence [1] . • If you prefer a customized, durable structure: Frame in treated lumber, match stud spacing to sheet widths, and incorporate gable vents and raised beds for function and comfort [3] . • If you need low cost and speed: Build a cattle-panel arch over a secure base, sheath with greenhouse film, and plan for periodic film replacement and strong anchoring [5] . For ventilation, temperature control, and finishing touches, integrate adjustable vents and fans during the build, and consider heaters based on your power availability [2] .
[1] Lowe’s (2024). How to Build a Greenhouse – kit assembly tips, base leveling, panel handling. [2] Lawn Love (2024). How to Build a Greenhouse in 8 Steps – materials, ventilation, and heating guidance. [3] Fletcher Creek Cottage (2021). Building a Greenhouse From Scratch – wood frame, base anchoring, door example. [4] YouTube (2023). DIY Greenhouse | Don’t Buy a Kit Until You See This – gable vent framing, collar ties, truss workflow. [5] YouTube (2023). The Ultimate Guide to DIY Greenhouses – cattle-panel tunnel pros/cons and flexibility.

MORE FROM hotondeals.com